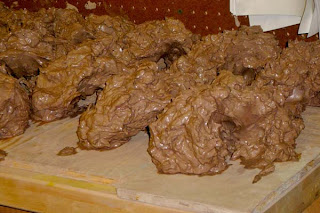
 In my Good to the Last Drop, Part I post, I described how I recycle as much as I can of the scrap clay that I generate while making pottery. Any excess clay that has not been fired and is not contaminated gets thrown into a plastic bin where I reconstitute it into reusable clay. After many days of throwing scraps into the bin and pouring water on top, the clay becomes what potters call “slurry”, that is very drippy, liquid clay.
In the large Chicago studio where I first learned the craft, they had an alcove with two large plaster covered surfaces which they would use to dry the slurry into usable clay. They would slop about 5 inches of slurry all over the plaster surface and then let the plaster slowly absorb the moisture and convert the clay for reuse.
 Alas, I currently have a small studio and I cannot spare even an inch of table top space for a plaster surface, so I use small wooden bats to accomplish the slow absorption that the plaster does. Rather than slopping on several inches of slurry, I create little bridge shapes of clay.
The bridge shape not only allows the wood to absorb some of the moisture from the clay, it also allows a maximum of the clay's surface to air dry around and through the exposed external surfaces. Left uncovered, my clay bridges dry sufficiently in about 4-6 days depending on the temperature in the studio.
Have you seen the movie Amélie? One of my favorite scenes is right at the beginning where Amélie’s favorite things are chronicled documentary style. Among other things, she loves peeling dried glue from her fingers, she loves putting raspberries on each finger and eating them one by one, she loves cracking the sugar shell on a crème brulee, and she loves sticking her hand into a big burlap sack of dried beans at the street corner shop.
For the tactile oriented (and I include myself in this group) Amélie’s list makes us giggle with recognition…of course, we are all like this. Well, with that in mind, I want you to imagine the tactile sensation of digging down into the cold, wet slurry bucket to grab a handful of clay, shape it into a bridge, and carefully place it down onto a wooden bat so that it doesn't collapse. Mmmm, yummy.
No comments:
Post a Comment